INTERIOR DECOR WITH DABS
THIRD TIME'S A CHARM
On the 4th of March 2017, Savvy and Chic hair beauty hub moved once again to a new location- Suite 12 Ikeja Way, Dolphin Estate Ikoyi!
Here are before pictures;


All it took was a fresh coat of paint in my colors, I broke down a wall to convert what was the former toilet to a Shampoo nook, then I built a completely new toilet area.


Finally, since I now had a store front, I covered the entrance with some faux grass up to the stairs, built a focal wall with our logo on it for the reception area, added a few potted Aloe vera plants...


The hub also comes fully kitted with a smoothie bar where we serve fresh fruit smoothies made from scratch-


This is one of my favorite makeovers...I just love the colors!! I am itching for another makeover so watch this space!!
THE NEW SAVVY CHIC HUB REVAMP!!
Hiya,
Been agesssss since I updated this page!! I have quite a lot to share!! From my DIY table I refurbished off OLX to all the POP work that had to be done at the space...let's begin shall we?!!
THE BEFORES;


WORK BEGINS;
The ceiling had to be done ASAP!! Took out the suspended ceiling in the main show room and replaced them with POP boards...

Then they worked on the POP Arches for shelves;

Walls were painted, lights were fixed!!- I love the cozy feeling spot lights give!!

For the Inner Treatment room, we painted the focal wall sea green;

I had my POP guy who also does signs make the STEAM BAR sign and situated two spot lights on either side.
The glass shelves were used to house mason jars filled with different natural hair treatments from Palm oil to Honey to Bentonite clay...

I had the electrician put up 4 pendant lights which I got from the Palms at a very inexpensive price- Each was less than N2000!!

The Steam bar comes with a bar like table with a glass top which was made here and 2 bar stools. On top of the table, we put two Heutiful Hair Steamers and throw pillows for even more coziness!!

The other section of the new space is my Office;
I was going for a black and white themed office, started out by revamping this table the POP guys had used as a work table and turned into an office shelf....

Painted the outer planks with white oil paint( by myself if I might add *wide grin*)
Then decided to hot glue this Parisian themed plastic picnic table cover I purchased some time ago...

I used my glue gun and glued the inner walls of my re-purposed office shelf; I didn't mind the dried up POP drops at the edges of the shelf, I think they give the shelf some edge :)

Framed some printed out sayings in Black and White;

I had this picture of the Eiffle Tower which I decided to put up on a cork board I purchased from a craft store and guess what? The picture is being held up by an old earring( lost the other ear)!!

To the rest of my office, I added a very furry white floor rug, black curtains and my white/black furniture...I hope to make the best decisions in this Office :)


Finally, the passage needs a mention; It looked dark and dingy when I got the place so I decided to give it some life with turquoise blue walls and I put up that DIY black board I made;


 |
| Look at the Craftmanship!!! |
THE AFTERS;


 |
| OUR ADDRESS- 30 NORMAN WILLIAMS STREET, IKOYI, LAGOS |
There's still lots of things I have planned for the space...like a very chic shampoo section like this which we are presently lacking;
 |
| My Inspiration pic!! |
Also have some space for extensions and wigs, so stay tuned if you'd like to see those transformations.
Has anyone been doing some renovating lately? Please feel free to share below...
DIY BLACK BOARD
Hiya,
So for those who have been staying updated with my company- Savvy & Chic Hair Beauty Hub, you'd know that we moved...and if the before and after pics of our first store are anything to go by;


Then you know I have big plans for this new space that is twice the size...I will make sure to share the transformation on the Interior Decor with Dabs page...so stay tuned for the updates... After a stressful day today, I came home and decided to make a black chalk board for a wall at the new store...I have been seeing so many fun chalk board walls...
 |
| source |
 |
| source |
 |
| Source |
Don't you just love them!!! Well since I am renting, I didnt want the hassle of making the wall a chalk board directly, so I decided to turn a ply wood sheet lying around my house that is a great size into a chalk board...
To do so, I mixed acrylic paint( black) with baking soda-


No measurements, just eyeballed it and made sure to mix the baking soda properly with the paint; then I painted it on the wood board( got recipe from google, where else? :)
.jpg)
Turned out very well and I cant wait to hang it on the wall I made it for and put cheeky messages on it...well that's all for now...it was quite therapeutic getting this done....if you like stuff like this then get ready for more updates as I refurbish the store completely!!!
Xxx,
Dabs
NEW POST-ACCENT DINNING WALL.
Hiya, I'm back on this page to update another home improvement feature I made at our home. Its the ACCENT WALL we have at the dinning section.
Well first I have to share the inspiration for that wall;

I saw the above picture before we moved and I just loved how bold and different that wall with the shelves and plates was, so when we moved and had a open plan living room that flowed into the dinning area, I thought a wall like that will be great to demarcate the sections...so without much ado, the dinning area section of our home went from;

TO;

CLOSER LOOK;


So basically what I did was get the carpenter that made my pantry shelves to smooth out the left over wood to the best of his ability, then seal and stain it with wood sealant to prevent chipping, then I painted it this copper color from the Martha Stewart living metallic glaze collection;

To hold the wood planks, I thought outside of the box and used these decorative curtain holders;

With that, my accent wall is complete...what I like about the wall is that I can switch things up whenever I want, I can create a theme during holidays and just keep that wall fresh. So you see, an accent wall doesn't have to be a different color, you can just decide to do it this way and leave the paint the same.
So here's an up and down comparison for ya;
ANYONE HAVE IDEAS FOR AN ACCENT WALL BESIDES CHANGING THE COLOR?
FEEL FREE TO SPILL.
Xxx
Dabs
NEW POST- MY EXTERIOR DECOR(BACK YARD REDO)
Hiya,
Its been AGES since I updated this page and I have been meaning to since I made changes to my back yard but time oh time!!!
Without further ado let me share the before, the during and the after (for now)
THE BEFORE;

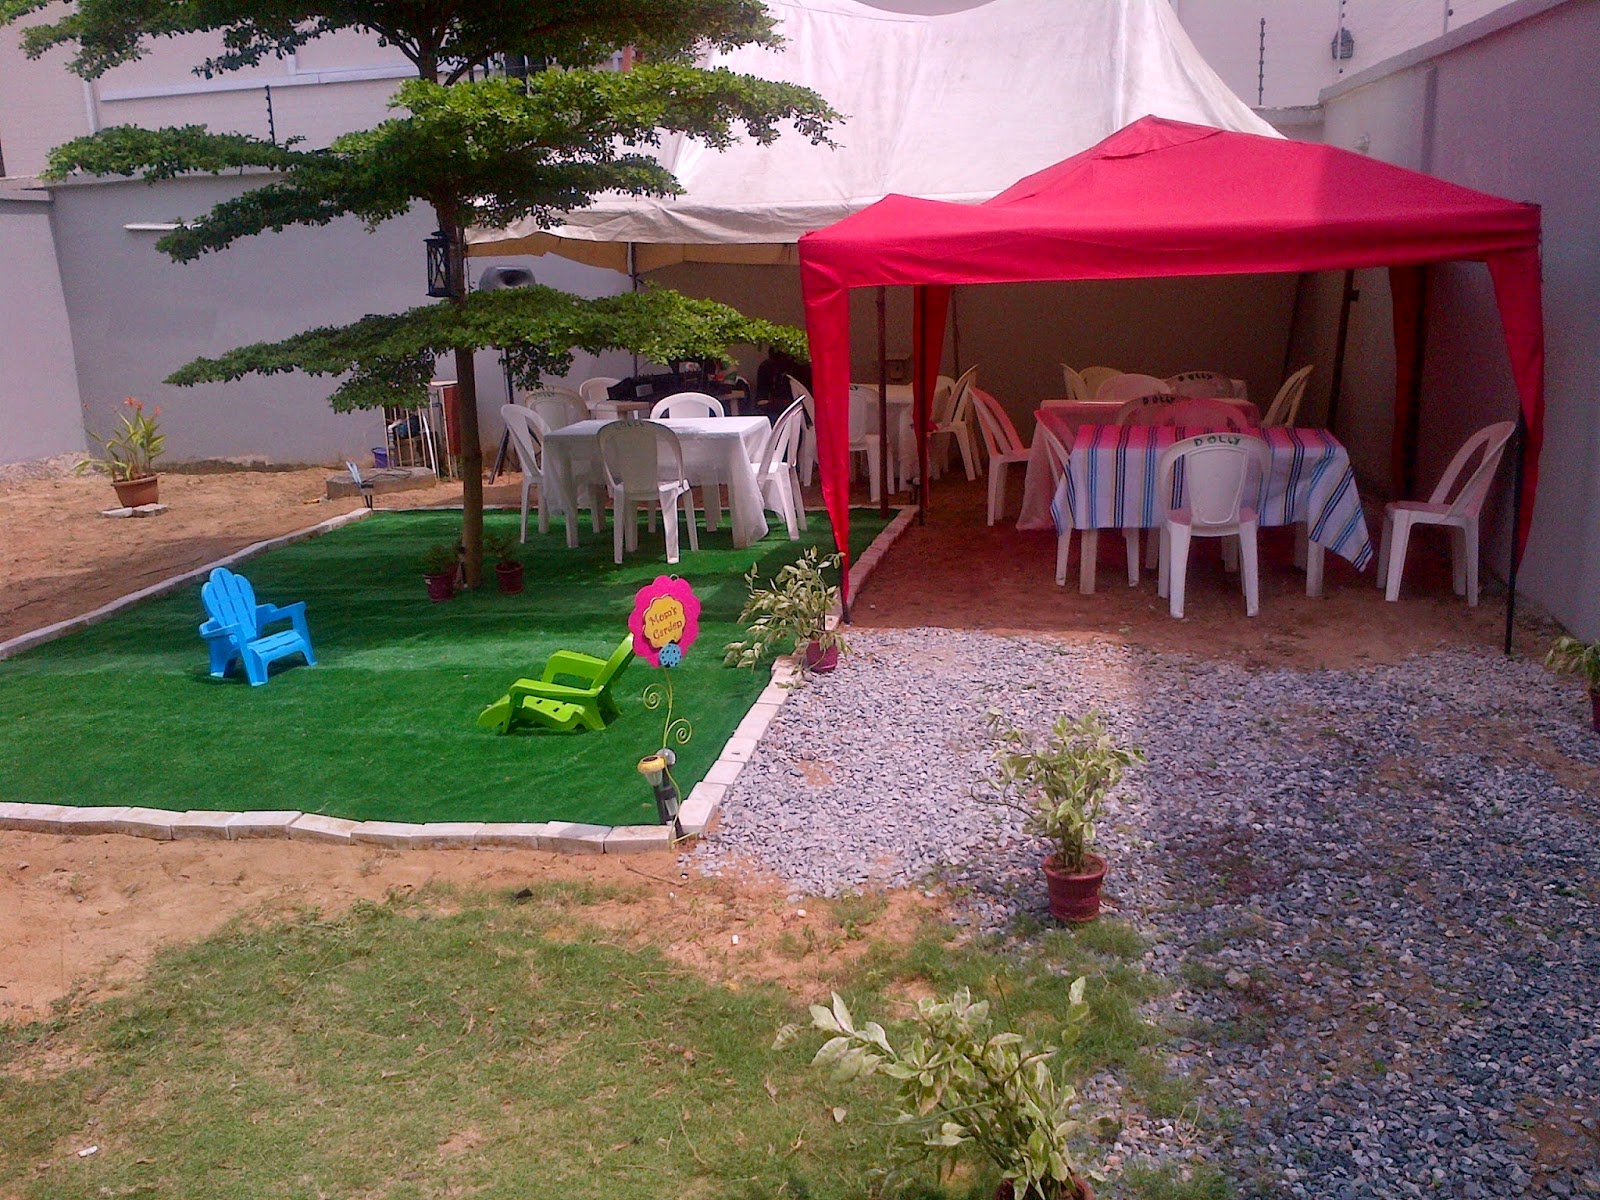
This massive bush was what we met when we first viewed the house and unlike some people that will shy away from this, I instantly fell in love because I saw the potential of turning it to a garden for the kids to play around in plus there'd be space to throw parties etc.
Once we moved and had settled, I got to work. First we cleared all the grass away (thankfully there were no snakes hiding in there, I was so scared we'll find one!) Then I decided to cordon off an area where I would lay fake carpet grass so the kids could safely play around in there...I wanted to use the grass on the entire area but that was going to cost an arm and a leg!lol

Then I added these solar garden lights around the tree and at the corners (they light up when its dark, really pretty). These are from America but I saw some at Game...

Next, we had to sprinkle salt all around the backyard to stop the weeds and unwanted grass from growing...it has worked so far, the weeds crop up now and then but not to the extent they did before.

Then I decided to pour some gravel on the entrance area...we pour a lot of water around that area and the gravel is a great way to absorb the water and keep the ground looking neat.


I put up my Mum's Garden sign and other cute signs I got from a store in America called Garden Ridge for those that care to know :)
When we were done, the back yard looked like this,

Then we added the faux carpet grass and a canopy I got for the back yard as well as a few flower pots to spruce up the area;
The After;

 |
| My son's dedication day. |


That's all for this post, thanks for reading!!
P.S Any suggestions on what I should grow in the Garden? Please share :)
Xxx
Dabs
IT'S TIME TO RE-PURPOSE!!
Let me first introduce you to this page; As much as I loooove my hair and talking about caring for it, I also loooove home decor, crafting and just keeping my home interesting; my love for such things escalated when I stumbled on home improvement DIY blogs which I have listed under my blog list!My new found escalated obsession love has now been given a chance to blossom since we moved from a condo to an actual house few months back, so room by room, space by space, this page will document how I transform a house we moved into a home...for ladies who like stuff like this feel free to recreate some of the projects I embark on and also feel free to drop tips and comments below!!
Now to re-purposing;

I got this server above(for tortilla chips and dips) at Target while in the States and quickly knew what I wanted to do with it...A faux flower planter was what I thought! So I grabbed some oasis as well as faux flowers all from the dollar shop.
Now back home, I cut my oasis into small squares to fit in the cups;


Then I cut the stems of the flowers so they became single stems instead of being bunched up;


Then I simply stuck the stems in the oasis one by one till this was created;


Doesn't it look like a real flower planter :) I changed the position to a corner stool because of how small it looked by the tall window, so here it stands;


The next re-purpose was a shelf liner I got at Anna's Linen; basically self liners are soft rubber like mats that are used to line shelves so that things don't slip out or just simply to keep them clean and organized but I decided to use my shelf liner as..................WALLPAPER/BORDER-It was just too pretty to hide away in a shelf!(Hides face)


Then I brought out a glue gun which I purchased from GAME @ the Palms(If you want one and live in Lagos) and then I glued away;

When I was done bordering round the small guest toilet with the shelf liner, it was the perfect finish to my Parisian themed toilet :)


Love Love Love the results... Do you?! Have you been re-purposing lately?!Feel Free to share your re-purposing tips below...
Xxx
Dabs
YOU ARE MY SUNSHINE- MY SUNSHINE YELLOW INSPIRED BATHROOM REVAMP!
I am here with another home update! This time I took the extremely gross looking bathroom (our home had been on the market for over a year before we got it) and brought in some fun with sunshine yellow bathroom accessories. So without further ado, the bathroom went from looking like this;
 (what a dingy choice of color for the sink and toilet WC- we changed those out completely to white ones)
And now looks like this;


 The different yellow accessories brighten up the otherwise bland space and are a simple but effective way to cheer up a room. I love the vibe it gives off whenever I am in there- I cannot imagine what it would have been like if I just managed the space the way it came!!
Have you thought of adding just a little color here and there to cheer up a space in your home? Try it, it just might make you smile!!
Xxx
Dabs
THE SAVVY & CHIC HUB REVAMP!- YOU WON'T BELIEVE YOUR EYES!!
Hiya,
So I have been meaning to blog about how I transformed our hub to what it looks like today! I am going to be sharing a few tips on interior decorating and making a space work for you.
But first behold the pictures of the Hub the way I got it;


I've always had a thing for stripes so I thought, they'd be great for a focal wall, then I had the arches painted for even more impact.
The next major hurdle I had to cross was furnishing! I was torn between buying furniture from America and making furniture here in Nigeria! My dilemma was quickly put to rest when I checked around furniture shops and inquired about making them, prices were OUTRAGEOUS!! I'm talking N180,000 for 2 accent chairs!! I was running out of time, so I quickly ordered a few pieces with my products and then I found a treasure; OLX.COM!!!INTERIOR DECOR TIP 2!!
There I finally found reasonable priced furniture!! I got my 3 desks including a nice sized reception desk from a trader there at N20,000 each. Got our center display table for a steal(DON'T HESITATE TO NEGOTIATE WITH THE SELLERS), I think N11,000, it was brown, I painted it white!! OLX is just awesome, It's the same place I got my staff (a stylist and customer rep.) I also got chairs from here except the 2 white accent chairs I talked about.


Back to lights, I almost bought a chandelier from the US for about $96 without shipping until I stumbled into a store on Lekki express way,unfortunately can't remember the name but I know directions. They had wonderful unique lights and great prices, my amazingly bright chandelier was just N30,000 and that's $177 when converted which is okay seeing that I didn't have to pay for shipping.
 Again with lights, feel free to have fun, I got crystal spotlights for slightly higher in price than normal ones which I put under the opening on the focal wall with strips. Their effect is beautiful;
 Finally, We put up product logos under the spot lights to make the space even more organized,we have HAIR, BEAUTY,NAILS Sections;


I got interlocking faux wooden floors for the center display table from the US (very affordable and durable over getting a carpet), made some shelves for the display window from a lady called CHIC CARPENTER (look her up, brought in the off white futon and dressing table I ordered from the US to give the space an intimate feel and we were ready to open!!

 Hope my tips will help some one out there. Just for drama, here's a side by side before and after;


Hope you enjoyed this post, check back for more decor posts!!
Xxx
Dabs
YOU ARE MY SUNSHINE- MY SUNSHINE YELLOW INSPIRED BATHROOM REVAMP!
I am here with another home update! This time I took the extremely gross looking bathroom (our home had been on the market for over a year before we got it) and brought in some fun with sunshine yellow bathroom accessories. So without further ado, the bathroom went from looking like this;

And now looks like this;


Have you thought of adding just a little color here and there to cheer up a space in your home? Try it, it just might make you smile!!
Xxx
Dabs
THE SAVVY & CHIC HUB REVAMP!- YOU WON'T BELIEVE YOUR EYES!!
Hiya,
So I have been meaning to blog about how I transformed our hub to what it looks like today! I am going to be sharing a few tips on interior decorating and making a space work for you.
But first behold the pictures of the Hub the way I got it;


 |
| YUP, That was the roof!! |
I initially was frightened and as I had given myself about 3 weeks because I wanted to launch on my birthday, it was a race to the finish line!!
Fist thing I had to think about was shelving, I wanted glass over wood for space management and also to give the space an airy feeling rather than have it all boxy. But I didn't just want them sticking out every where on the wall which I decided will be white (again to make the space look bigger) so I decided to have POP arches made round the wall;

Over the arches, I made an electrician create outlets for spotlights in the middle.
#INTERIOR DECOR TIP 1; NEVER GET YOUR ARTISANS FROM THE SAME SOURCE!!
I learnt the hard way, the POP guy got the electrician and together they tried to extort me! When I blew their cover, they abandoned the job!!! luckily, they had already done most of the work but since I had paid 80% (was supposed to be like 75% but everyday was a money issue) I could console myself that at least they didn't get 100% of the money. I got another electrician to fix the lights.
Next was paint and off to GAME I went. For my home, I bought Dulux paint and for the shop that was my intention but they didn't have the size (2.5lts) I wanted which was like N9000 a can and wanted me to buy the even pricier can until my eyes wondered to the shelves behind, paint by SUNIVIL(hope I spelt that right). Their's was like 3.6ltrs for about N6000, I looked at the quality and the variety of colors, they had and it was the same as Dulux, so off I went full of joy with 2 cans of the pink and green shade I used(can't remember names) for a fraction of the price. The white color I got for even cheaper from Sandtex paints, its called BRILLIANT WHITE (Their biggest bucket is at least half the price of DULUX and white is white!)


I've always had a thing for stripes so I thought, they'd be great for a focal wall, then I had the arches painted for even more impact.
The next major hurdle I had to cross was furnishing! I was torn between buying furniture from America and making furniture here in Nigeria! My dilemma was quickly put to rest when I checked around furniture shops and inquired about making them, prices were OUTRAGEOUS!! I'm talking N180,000 for 2 accent chairs!! I was running out of time, so I quickly ordered a few pieces with my products and then I found a treasure; OLX.COM!!!INTERIOR DECOR TIP 2!!
There I finally found reasonable priced furniture!! I got my 3 desks including a nice sized reception desk from a trader there at N20,000 each. Got our center display table for a steal(DON'T HESITATE TO NEGOTIATE WITH THE SELLERS), I think N11,000, it was brown, I painted it white!! OLX is just awesome, It's the same place I got my staff (a stylist and customer rep.) I also got chairs from here except the 2 white accent chairs I talked about.
Back to lights, I almost bought a chandelier from the US for about $96 without shipping until I stumbled into a store on Lekki express way,unfortunately can't remember the name but I know directions. They had wonderful unique lights and great prices, my amazingly bright chandelier was just N30,000 and that's $177 when converted which is okay seeing that I didn't have to pay for shipping.
Another interesting idea I came up with was having a Shea butter station!!I mixed different oils/butters in Shea butter and came up with 3 good for hair/skin whipped shea butter recipes and it has remained a hit!! Believe it or not, The table holding the bowls of Shea butter is my sons' nappy changing stand and a plank of white wood that must have come with the baby wardrobe!!LOL. The chalk board I bought from GAME with some chalk and painted the body/legs white.
Hope you enjoyed this post, check back for more decor posts!!
Xxx
Dabs


